Showing posts with label @mathequalslove. Show all posts

Friday, August 14, 2020

Engaging Activities for Skills Review in Precalculus

Our first unit in Precalculus is a skills review of Algebra 2. My school bought the All Things Algebra Precalculus curriculum for me to use and it begins with this review. As much as possible I want my students to be hands on with the concepts, actively working through them in each class. Here's my collection of activities we worked on in Unit one.


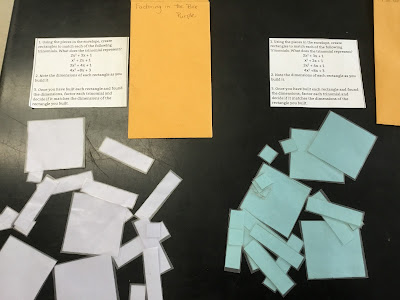
As we reviewed factoring I pulled out an exercise I put together when I was working on my Masters...many years ago. This essentially asks students to factor using areas. They build the polynomial into a rectangle and the factors are the dimensions of the sides. Here's a picture of a couple of the solutions.


Here is the document of directions that are in the envelopes with the pieces.

On the second day of class, we did speed dating to practice naming polynomials courtesy of Math = Love. The students really enjoyed the interactions.

I also found this question stack on Sarah Carter's Math Equals Love blog when we were working on simplifying rational expressions. This is a self-checking exercise. Students lay out the cards answer side up. They flip one card over to reveal a question. They solve and search for the answer card. Once they find the answer card, they flip that card over to reveal the next question. If they have simplified correctly, the last answer will be on the other side of the first question.


When we moved onto solving rational equations, we practiced with the following method. I typed out three questions, put them on this divider and then taped it to a large piece of paper. Students worked in groups of three. Each person in the group started with one problem, and a few minutes later I would tell them to rotate. They would then continue working on someone else's problem. I tried to switch twice so each student would work on parts of all three questions.


When we were still working on simplifying rational expressions, we also did a jigsaw. I gave each of the groups of students two of these problems, then once solved, they reformed groups with people they hadn't been with before, and each member in the new group explained their questions to the other group members.


When we worked with simplifying radical expressions, I found this tarsia puzzle I can't remember the source, but I know it was free. I let the students cut up the big triangles and then they worked to figure out how to put the triangles together into one big triangle that put the radicals with their simplified versions.


Toward the end of the unit, I discovered open-middle problems and had these two from the Count it All Joy blog for warming up to absolute value inequalities. There are many possible solutions and the students have to think through their strategy to place each of the numbers since in these exercises the challenge is to only use each of the digits once. 


And that's a wrap for Unit 1. 


Saturday, June 20, 2020

Composition of Trig Functions Leap Frog


As I was preparing to teach the concept of compositions of trig functions, I read this post on Math = Love. Sarah explained how to play the game of leap frog to help students practice finding the values of trig functions using the unit circle. When I looked at Sarah's answer bank for the activity, I knew that I could easily adapt it to the compositions of trig functions I wanted to practice with my students. 


The bulk of the work was putting together slides for the questions so I could switch to the next question with just a click. Now, I love all things Google, but there is no equation editor in Google Slides. So, I put all of the expressions in a Google Doc and then cut and pasted them into the Slides presentation. It was a lot of work, but I was happy with the end result. It was also a big hit in class, and by the end, the light bulb had turned on for the whole class for this concept. 


I did this in February, before Coronavirus sent us all home. Since we were together, I actually had them leave the answer cards behind and just move seats and use the answer cards that were at the next seat.  If we are together this coming school year for this, I may need students to carry their answer cards with them to whatever seat they are moving to to minimize sharing of supplies. 

So, here are my files:

Tuesday, September 12, 2017

First Day of Physical Science (Part 2)


Today was actually the first day of Physical Science.  I teach this class at a homeschool consortium that started today, so it is certainly falls into the category of a non-traditional classroom.  I only see this class for one 90 minute period a week, and I design the class with all hands-on labs to complement whatever chapter/topic they are reading and studying at home.


After we finished with our team building activity with Legos and clue cards that I blogged about earlier here, we moved onto the Mini Metric Olympics. I used the direction cards from this post on Math = Love. The only thing that I had to do besides gathering materials was create an answer sheet that would fit into their notebooks.  I also wanted them just to find their percent error, so I only included a column for that, not error.


The kids loved the activity and I actually overheard one of the students say, "This class is fun," as her group was moving from one station to another. That's a win in my book!


Lots of measuring going on...

...and estimating too.

Friday, August 11, 2017

First Day of School Plans for Physical Science (Part 1)


I cannot even tell you how tickled I was last year to see that Sarah Carter of Math = Love was teaching Physical Science. I knew I'd be teaching physical science this year, and would have resources available from her blog to use. As I figured, I am starting the year with two activities she blogged about.


I love having students work in collaborative groups. I wrote my master's thesis about it! One of my grad school classes actually had Elizabeth Cohen's Designing Groupwork as a text. I plan to use "Broken Circles" from this book a week or two after school starts. But more on that later. What I'm going to use to start training students in collaborative work is the exercise "Build It." from the book Get it Together: Math Problems For Groups Grades 4-12. Sarah blogged about it here. The directions and cards are available from Stanford University. I did rework the directions slightly to work with the materials I had (Legos) and to work with the titles I had for roles that students play in their group. Here's the direction sheet each group will get:

Build It
Everyone Gives Information


Supplies: (To be picked up by the materials manager)
  1. Baggie with Build It clue cards (start with Built It #1 cards, only take one set at a time, come back for the others when you are finished with your current set, and return the set you are finished with)
  2. A set of square Legos (2 each of red, yellow, orange, blue, purple, green)
  3. A piece of graph paper


Objective: Your group's goal is to build structures described in the clue cards, following the rules below.


Rules:
  1. The Materials Manager will open one envelope and pass all the clues out to members of the group.
  2. Each of you, may look at your own clue(s) and tell your group what it says, but do not show the cards to anyone else.
  3. Build it!
  4. When the group is done, review your clues to make sure that you really are finished. (The Monitor should give final approval.)
  5. The Recorder should sketch your solution on graph paper.
  6. Return the cards to the front and try the next puzzle following the rules above.
  7. When time is up, return all cards in their baggies, and all Legos to the front.


Discuss the following question:
How did your group know that you had solved the puzzles?

Adapted, with permission, from Get It Together, © 1989 The Regents of the University of California. Program for Complex Instruction — Stanford University.


I printed and laminated all of the build it direction cards and bagged up the appropriate Legos (thanks to my younger two daughters who have quite the Lego obsession). Last night I asked my mom (who is visiting) and my 15 year old daughter to be guinea pigs and try this out, since in general I don't like to do activities cold in class. I am ashamed to admit this, as someone who has taught Geometry, but we decided that edges were the lateral surfaces of the Legos and the faces were the top and bottom. I can assure you that Build It #1, #3, and #4 will not work with these incorrect definitions. Fortunately, my mathematician husband came in and asked some clarifying questions about edges and faces and light-bulbs lit up.  The builds went much better after that. I decided that I will give students these definitions in diagram form at the beginning so they can get to figuring out how to work together right away.


We did find one card that didn't work in the Build It Between set of directions.  There are two cards, one that says, "The green cube is between the orange cube and the yellow cube." and another says, "The orange cube is between the green cube and the yellow cube." I think the easiest fix is to leave one of those cards out. We put the row together by leaving out, "The green cube is between..."


In our attempt to understand the directions when we were confusing what an edge was, I googled Build It to see if I could find some pictures of solutions. Instead of solutions, I found another cooperative group building exercise that I think I'll use a couple of weeks into the school year.  The document is here. In this exercise students use clue cards to build a city block. 

This tower needed a view from the bottom to see all of the blocks.